Proxy Server Settings
If CTP uses a proxy server for internet access, you can update the CTP proxy server settings on Windows as follows
-
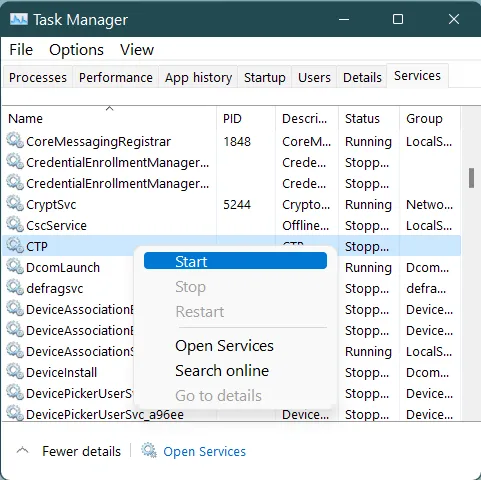
Stop the CTP Windows service
- If you already have a Services short-cut on the Windows desktop, double-click the short-cut to start Windows Services
- If not, click the Windows start button, start typing “services” and the Services App icon should appear
- Click the Services App icon to start Windows Services
- Locate the CTP service in the list of services, right-click and select Stop from the context menu
-
Start the CTP Launcher
- If you already have a CTP Launcher short-cut on the Windows desktop, double-click the short-cut to start the CTP Launcher
- If not, locate the CTP service in the list of services again, right-click and select Properties from the context menu
-
Use the Path to executable entry to find the installation folder for CTP. It will be in the form
<install folder>\windows\CTP.exe -
Open a Windows Command prompt window (Start button, type “cmd”, click the Command Prompt App icon)
-
In the Command Prompt window, enter the following commands
cd <install folder>java -jar Launcher.jar
-
-
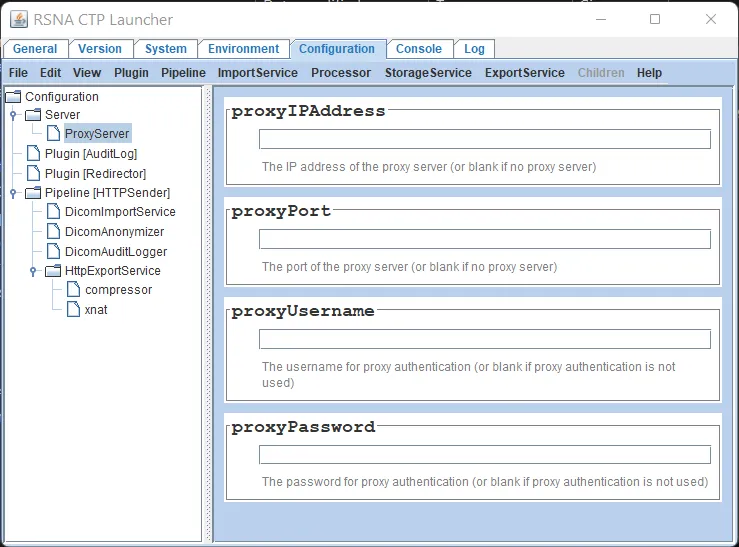
Navigate to the CTP Launcher Configuration tab
-
Use the navigation panel on the left to select Configuration -> Server -> ProxyServer
-
Update the proxy server settings in the right panel as required. You can set an IP address or host name in the proxyIPAddress field
-
Select File -> Save from the main menu bar to save your changes
-
Close the CTP Launcher using the Window close button at the top right
-
Close the Command Prompt window
-
Re-Start the CTP Windows service using Windows Services
Locate the CTP service in the list of services, right-click and select Start from the context menu
Troubleshooting
Section titled “Troubleshooting”- If the CTP Windows service Stop is disabled, try restarting Windows Services as administrator by right-clicking the icon and selecting Run as administrator