This is the multi-page printable view of this section. Click here to print.
Clinical Trials Processor (CTP)
1 - Installation
Installing CTP on Windows 10
CTP installation steps
- Create a new user for CTP on UQ RCC XNAT (not an AAF/OpenID user) with required project access, without admin access
- Download the following files
- CTP-installer.jar
- ctp_clinical_site_to_xnat_config.xml
- dcmtk-3.6.6-win64-dynamic.zip
- dicom_viewer_Mrbrain.zip
- Optional if you need more DICOM samples: sample1.zip
- Install CTP using:
cd INSTALL_FOLDER (replace with your actual folder) java -jar CTP-installer.jar - Replace CTP/config.xml with ctp_clinical_site_to_xnat_config.xml
- Edit CTP/config.xml
- Change “xxxx.xxxx” in two “url” tags to “xnat.rcc.uq.edu.au”
- Change “xxxx” username and password tags to match new user from step 1
- If CTP internet access is via a proxy server, add the proxy server element to the Server configOnce this element is added proxy server settings can be updated in the CTP Launcher GUI
...
<Server ...>
  <ProxyServer
    proxyIPAddress=""
    proxyPort=""
    proxyUsername=""
    proxyPassword=""/>
</Server>
...
- Add CTP the anonymiser script
- Copy CTP/scripts/DicomServiceAnonymizer.script to CTP/scripts/dicom-anonymizer-sender.script
- Add the PROJECTID parameter to the list of parameters at the start of the file
<p t="PROJECTID">my xnat project id</p>
- Change the PatientComments element 0010,4000 to set XNAT project routing info
@always()@append(){Project:@param(@PROJECTID) Subject:@contents([0010,0010]) Session:@contents([0008,0050])}
- Review/set other parameters at the start of the file
- PROFILENAME, eg. AIS-Clinical-Site-210604
- DATEINC, eg. 0
- PROJECTNAME, SITEID, SITENAME, TRIALNAME, TRIALSPONSOR as required
- Optional: review script to check anonymisation settings are appropriate
- Start CTP GUI
java -jar Launcher.jar - Click the CTP “Start” button
- Click the “CTP Home Page” button to open the Web UI
- If the browser can’t connect, check CTP is not already running, or try changing the Server port
- Login
- Top RHS banner should show “Welcome admin”
- Optional: click “User Manager” to change default usernames/passwords
- Optional: click “DICOM Anonymizer” to view/edit anonymiser script
- Unzip DCMTK and MrBrain dicom sample
- Try sending an dicom to CTP using dcmtk
cd dcmtk-3.6.5-win64-dynamic/bin dcmsend localhost 25055 ../../dicom_viewer_Mrbrain/MRBRAIN.DCM - Login to the XNAT server with an admin account to view Prearchive
- Use “Upload” → “Go to prearchive”
- DICOM should appear in “Receiving” status, with project id assigned from step 6
- Optional: non-admin users need to search by subject/etc
- Use Refresh to check when “Ready” or it disappears from list (as it has been routed to the project)
- Debugging: use dcm2xml from DCMTK to check anonymised dicom file under CTP/roots/FileAfterAnonymization25055
- Logout and login with the new XNAT user from step 1
- Navigate to the project set in step 6
- You should see the dicom listed as subject “1737775597”
- Use subject “1737775597” → “MR Session” → “View Images” to view the uploaded image
- Try a dicom send from the scanner using PC address and port 25055 (check windows firewall settings?)
- Enable CTP as a Windows Service. Instructions here
Further information
If you need a different commit of CTP-installer
git clone https://github.com/johnperry/CTP
cd CTP/products
git checkout <commit> CTP-Installer.jar
If you need other AIS CTP config files
git clone https://github.com/Australian-Imaging-Service/configuration.git
cd configuration/CTP
CTP documentation links:
2 - Proxy Server Settings
If CTP uses a proxy server for internet access, you can update the CTP proxy server settings on Windows as follows
Stop the CTP Windows service
- If you already have a Services short-cut on the Windows desktop, double-click the short-cut to start Windows Services
- If not, click the Windows start button, start typing “services” and the Services App icon should appear
- Click the Services App icon to start Windows Services
- Locate the CTP service in the list of services, right-click and select Stop from the context menu
Start the CTP Launcher
- If you already have a CTP Launcher short-cut on the Windows desktop, double-click the short-cut to start the CTP Launcher
- If not, locate the CTP service in the list of services again, right-click and select Properties from the context menu
- Use the Path to executable entry to find the installation folder for CTP. It will be in the form
<install folder>\windows\CTP.exe - Open a Windows Command prompt window
- Click the Windows Start button, start typing “cmd” and the Command Prompt App icon should appear
- Click the Command Prompt App icon to start the Command Prompt
- In the Command Prompt window, enter the following commands
cd <install folder> java -jar Launcher.jar - Use the Path to executable entry to find the installation folder for CTP. It will be in the form
Navigate to the CTP Launcher Configuration tab
Use the navigation panel on the left to select Configuration -> Server -> ProxyServer
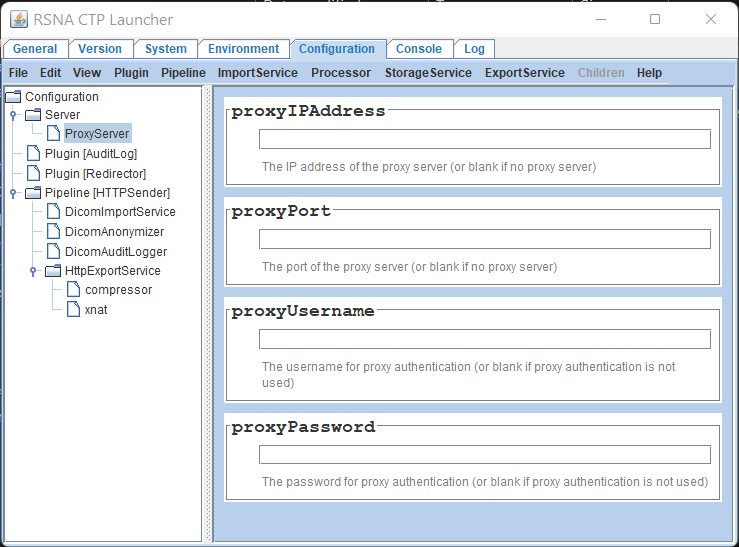
Update the proxy server settings in the right panel as required. You can set an IP address or host name in the proxyIPAddress field
Select File -> Save from the main menu bar to save your changes
Close the CTP Launcher using the Window close button at the top right
If the following prompt appears, select No.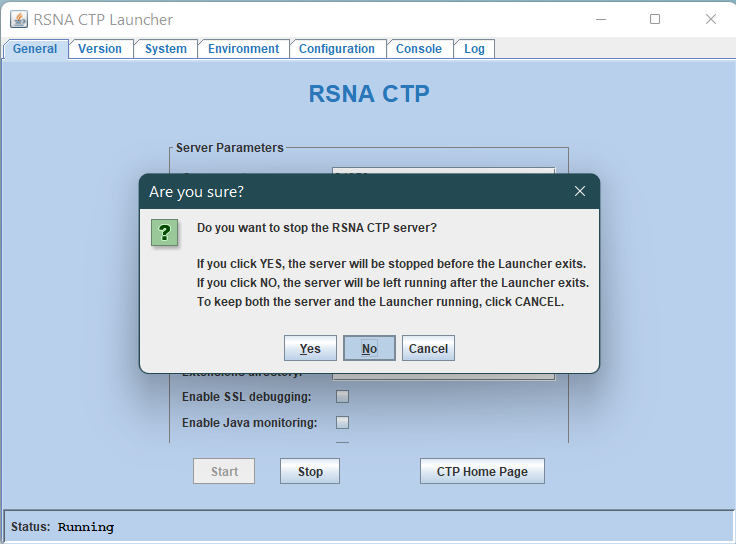 If the CTP is stopped, restart it from the Windows services menu (See below)
Close the Command Prompt window
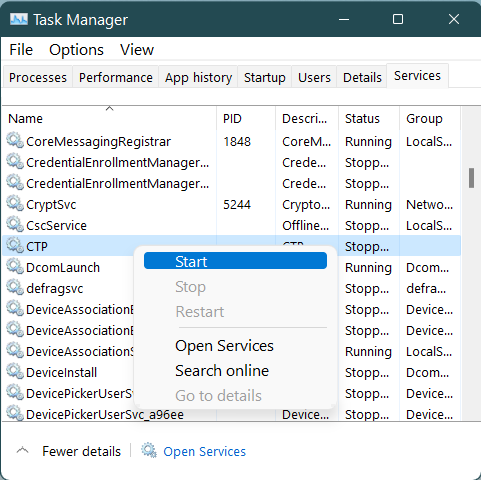
Re-Start the CTP Windows service using Windows Services
Locate the CTP service in the list of services, right-click and select Start from the context menu
Troubleshooting
- If the CTP Windows service Stop is disabled, try restarting Windows Services as administrator by right-clicking the icon and selecting Run as administrator
Further information
3 - Windows Service
The CTP install.bat script uses Apache procrun. Use the following steps to enable CTP as a Windows service, including an update to use a JRE other than system default (leave out step 2 if using the system default JRE)
- Install CTP
java -jar CTP-installer.jar - To use JRE other than system default, edit
<ctp-home>/windows/install.bat. Find the –Jvm=auto, add –JavaHome entry and set both as follows--JavaHome="<jre home> " ^ --Jvm="<jre-home>\bin\server\jvm.dll" ^- ^ is needed to wrap/continue command line in batch file
- The jvm.dll location under
is the same for JRE 1.7 and 1.8 installs. Confirm this is the case for other JREs/JDKs
- Run install.bat as Administrator to create the CTP windows service
cd <ctp-home>/windows install - Open Windows Services as Administrator and start the CTP service
- Open CTP administration page in Web browser
- Confirm the correct JRE is reported in Admin → System Properties and/or Admin → Log Viewer → ctp.log
Troubleshooting
- Installation paths are set in install.bat during CTP install so it won’t work if you move the CTP folder somewhere else after install
- If removing the service (with uninstall.bat) leaves the service stuck in delete pending state, reboot the system to complete
Further information
4 - Linux Service
Ubuntu
Open ./linux/ctpService-ubuntu.sh. Update the following parameters:
USER=ubuntu
CTP_HOME=/opt/ctp/CTP
JAVA_BIN=/usr/lib/jvm/java-17-openjdk-amd64/bin
JAVA=$JAVA_BIN/java
CTP_PID=$CTP_HOME/ctp.pid
Run the following to install the ctpService into init.d
sudo ln -s ./linux/ctpService-ubuntu.sh /etc/init.d/ctpService
sudo update-rc.d ctpService defaults 98 02
Start and stop CTP using the following commands
sudo service ctpService start
sudo service ctpService stop